This is a part of Git Tutorial Series.
In this page:
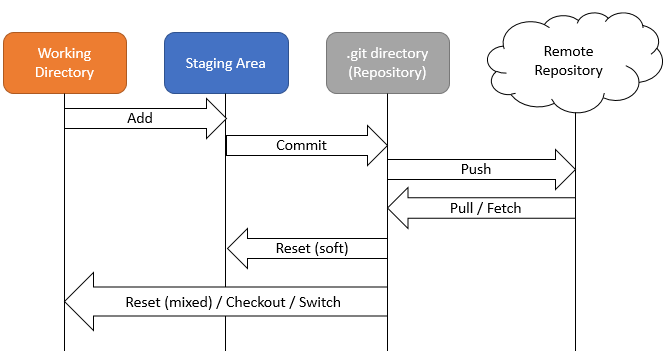
The Three States
There are three states in a local Git project: Working Directory, Staging Area, and Repository.
(There are some other commands which can do the transition similarly, but I seldom use them so they are omitted. However, it worths to mention that there is a VERY powerful command called reflog for advanced operations.)
Working Directory
This is where the files appears to the local file system. You create / modify / delete files in this state.
This is also the most dangerous state because if you do not backup your other version somewhere else, what you changed here can hardly be retrieved.
Staging Area
This area stores and bundle changes from Working Directory to form a commit when you commit to the next stage.
You may store your intermediate progress here so that get back to that certain point when needed, just like you protect your local changes by saving your files.
Repository
The most complicated, but also well organized (if you manage it well) state. Changes are bundled as commits and connected each other to form paths. There are branches and tags to indicate progresses / versions etc.
You may sync your branches and tags to remote repositories so that you can share with the others or just for back up.
It is a common practice to commit often. Do not be afraid of too many commits in your repository. Git can help you to organise them (e.g. combine some of them into one if you think some commits are too small).
Git Add
Now let’s try some Git commands.
First, make some changes to some files in the project.
Then, use command line tool and move to the project folder. Run “git add .” (note the period at the end of the command). The “.” at the end of the command means all files in this folder (recursive). You can specify which file to add, but I’d prefer using tools like VSCode to do so. Moreover, usually those tools can help you to check before you add as well.
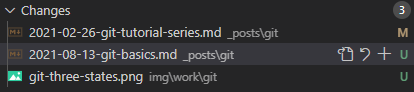
↑ VSCode interface for Git Add
From the VSCode UI, you can see the files you changed. At the right of each file name, there is a letter indicating the change type:
- U: Untracked, meaning the file is not tracked by Git yet. In other words, it is new to the Git repository.
- M: Modified, there are some difference to the corresponding file in the Git repository.
- D: Deleted, the corresponding file in the Git repository was deleted locally.
At the left of the letter, there are 3 buttons. You may hover on the buttons to see what they are. They can help to check, discard, and add your changes per file in a very handy way.
You may also hover to the row of “Changes”, there is a button for you to add and discard changes to all files.
When you added the files, the files are in the Staging Area.
Git Commit
Now the files are in the Staging Area.
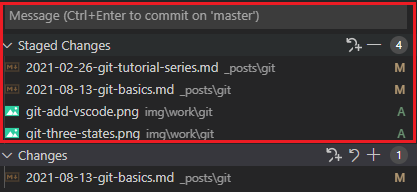
↑ VSCode interface for Staging Area
The UI is very similar to the Working Directory shown before, except that there is a message field at the top. The message is the Subject / Message of the commit when you commit this staged changes.
Before you commit, you may accumulate your changes from the Working Directory, which means you may store your intermediate progress in the Staging Area. Of course, you may even commit your intermediate progress. Its all up to your version control style. Before you push your commits, everything is changed locally without affecting the others.
To store your changes into a more organized way, you may want to commit your change. Instead of committing through tools like VSCode, you may commit using command line:
git commit -m "<your message here>"
-
If you want to change the commit message of the recent commit, you may run:
git commit --amend -m "<your new message>"Note: Changes in the Staging Area will also be added to the commit.
-
If you want to add changes in the Staging Area to the recent commit without changing the commit message , you may run:
git commit --amend --no-edit"
Git Stash
Sometimes you may want to manipulate the Git tree / branch structure, but you still have something changed and do not want to commit. Then you may use Git Stash. Then changes in Staging Area and Working Directory will be moved to a place called stash. Usually I will add “-u” flag so that untracked files are also stashed. So the command becomes:
git stash -u
To retrieve and clear the stash, use:
git stash pop
Of course there are some more advanced uses of Git Stash, but I am not going to cover here because I seldom use them.
Git Reset
When you have made a commit but you want to revert back, you may run:
git reset --soft @~1
where @~1 means one commit backward.
If you do not even want that commit, you may run:
git reset --hard @~1
Similarly, if you want to clear all uncommitted changes, you may run:
git reset --hard
Git Reset has more advanced uses when working with branches and tags, which will be explained later.