This is a part of Git Tutorial Series.
In this page:

I suppose you have already have your environment set up already. Let’s get your hands on Git.
Before you make your own Git repository, let’s download one from the others first to see what a Git repository looks like.
Git Clone
First of all, let’s download a repository from a server by running git clone. In the example below, we will clone a repository from GitHub.
- Go to the folder which is used to contain source code repositories (e.g.
C:\workspace), then in command line, run thegit clonecommand (the URL can be the other remote repository’s URL),
git clone https://github.com/avin-shum/EditorConfig.git
Note: For details of Git commands, you may check the help from console by -h flag, like,
git clone -h
or by calling local documentation by --help, like,
git clone --help
Git Graph UI
Now you should have downloaded the repository. If you follow the URL above, the cloned repository is in the EditorConfig folder.
Open the folder using VSCode (e.g. in command line, type code EditorConfig). At the lower left corner, there should be a Git Graph button. Click on it and you will see the tree showing the change history of this repository like below.
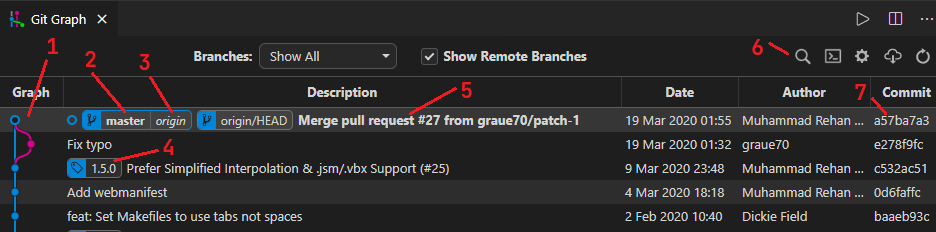
I am not going to explain every bit of the UI here, but some highlights below.
- Every row in the table represents one commit. You may click one of them and Git Graph will show the files involved in the commit
- The tree represents the change history. The hollow circle represents the current commit (where you are)
- A branch with branch name. Note the branch icon at the left of the name
- The name of the remote repository. In this picture, it joins item 2, means the remote’s branch master and the local branch master are on the same commit
- A tag with name. Note the tag icon at the left of the name
- Commit message of the commit
- Find function of Git Graph to search for commits, based on the commit messages
- Commit hash which is the ID of the commit. You may use it to specify the commit in some Git commands. It is generated automatically based on the commit’s characteristics. It changes even you just re-order the commits
Files in Git repositories
There are nearly no limitation of what files should be in your project, but there are some dedicated files used for Git or commonly used in Git repositories. Here are some examples,
.gitignore: Files and paths to be ignored by Git are listed here (Note: only applicable to those which have never included in the repository)..gitattributes: THe file to specify how the files and paths should be processed by Git. I use it mostly for Git LFS.LICENSE.md: Usually Git repositories have this to specify the license type of the project.README.md: Usually Git repositories have this to contain “read me” information of the project. Most Git server prints the content of this file to the front page of the Git project.
There is also a folder .git to store Git repository data. It is worth to mention that .git/info/exclude is a file like .gitignore but as it is in the .git folder, it is used locally only.
Git Init
Now you may want to make your own Git repository. Run,
git init
at the root of your project. Git will create a local Git repository there. If you want to upload the source, you may go to your Git server application to create a remote Git repository, then push the local repository to the server. The upload instruction usually appears in the newly created remote repository page.
Git Remote
git remote is a command to manage remote repository.
You may connect your local respository to more than one remote repository. In other words, you can link your local repository to many Git servers like GitHub, GitLab, and even a Git server you privately hosted at the same time. By Git’s decentralized nature, you can synchronize your source (and history) to many servers, and even decide which server to have which part of the history of the project very easily.
The remote repositories have their names assigned to them so you may specify which to operate in the Git commands.
For the default remote repository (usually when you clone from remote) is named origin.
Here are some useful git remote commands:
git remote -vv: Display details of the remote repositores (names and their corresponding URLs).git remote add <name> <url>: Add the URL of a remote repository and assign a name to it.git remote remote <name>: Remove the connection of a remote repository.git remote rename <old> <new>: Change the name of a remote repository.